Using HashiCorp Packer to automate VM builds in VMware

As part of my role in software implementation, I occasionally need to build groups of virtual servers to test different software installation scenarios.
I have had to build my own VMware home lab since most of the customers I deal with run VMware vSphere.
One of the best github repository I use is the Packer Examples for VMware vSphere. https://vmware-samples.github.io/packer-examples-for-vsphere/
On this post, I will try and provide a quick walkthrough on how I use this github repository.
Step 1 - Check the Environment Requirements
https://vmware-samples.github.io/packer-examples-for-vsphere/getting-started/requirements/
For my use case, I have decided to build an Ubuntu Server virtual machine on my VMWare vSphere 8 lab.
I followed the installation steps outlined on the link above. The Get the Project page has good explanations of the different directories within the repository. No GitHub account needed.
Step 2 - Download ISO
The repository includes a download script which helps download the common Windows and Linux operating systems and their popular versions.
These downloaded ISOs will need to be uploaded to one of the datastore in the VMware vSphere environment.
The simplest operating system to use for testing is Windows. I chose to download the Windows Server 2022 ISO.
Step 3 - Create a Service Account and its Require Privileges
It is recommended to apply and follow this step. This step helps with securing the service account by only enabling the needed privileges.
This step has been simplified using Terraform to automate the creation of the privileges.
Step 4 - Configuration
Run the config script to create the default config directory. I only have one VMware lab so I opted to keep it simple.
The config directory will be populated with the different Packer HCL files used to build the different virtual machine template operating systems.
Within the config directory, the four files I edited are as follows,
- build.pkrvars.hcl - I recreated the build key/ssh key specific to my Ubuntu packer machine.
- ansible.pkrvars.hcl - I copied the same ssh key I recreated
- common.pkrvars.hcl - I edited the content library and datastore to match my VMware vSphere environment
- vsphere.pkrvars.hcl - I edited the the values to match my VMware vSphere environment
Step 5 - Build the Template VMs
Run the build script and follow the prompts. That's it.
Tip #1 - I did not have a working vSphere content library so I opted to change these values on the common.pkrvars.hcl file.
common_content_library_skip_export = true
common_iso_content_library_enabled = false
Once the build is complete, the command line output should show the following.

The configured template folder should also show the operating system templates.
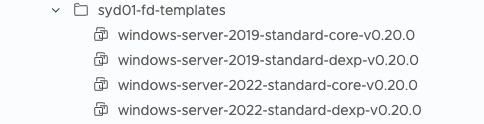
Tip #2 - The default timezone on the Windows virtual machines are set to UTC. This can be changed within the windows hcl files. In my case, I edited the windows-server-2022.pkrvars.hcl.
From,
vm_guest_os_timezone = "UTC"to,
vm_guest_os_timezone = "AU"These template virtual machines can now be used to automate the provisioning of combinations of machines using Terraform and Ansible.
If you are interested in how to use the above information to provision a virtual machine, you can go to this post. The post steps you through the building a Red Hat Enterprise Linux template.
https://connectedtech.com.au/ghost/#/editor/post/66cafc4b43b5cc0001b42223
If you found this post helpful, please click the subscribe link. You can then leave comments and questions on each of the posts and future posts.
Thank you and have a great day!


